Subtitles and Captions
| Site: | Welcome to Emily Carr University's Moodle Site |
| Course: | Animation Resources |
| Book: | Subtitles and Captions |
| Printed by: | Guest user |
| Date: | Saturday, 18 May 2024, 9:56 PM |
1. Definitions
SUBTITLES and CAPTIONS
- both of these types are lines of text and sometimes graphic symbols appearing in synch with media
- They are supplied so the audience can understand what is being said, and know about important sounds and music presence. This provides accessibility for audiences that might speak another language, or be hard of hearing.
- The two terms and their qualities might sometimes be referred to interchangeably, but there are technical and use-defined differences
SUBTITLES
- MAIN DEFINITION: these are for translating the dialogue of a film/video for a hearing audience that speaks another language.
- in theatrical settings, these are seen on screen as part of the film. These are "burned in" so they are a visual part of the media, and cannot be turned on/off
- crafted: prepared by someone in advance, and implemented as an accurate translation, with separate voices indicated, with specialty notations for variations in sound information.
- Premiere calls this option Subtitles (used to be Open Captions).
- Technical confusion: when we see subtitles in home displayed media and on mobile devices that can be turned on/off as a user option, these are a different type of captioning.

CAPTIONS
There are a few types: Open, Closed (CC), and SDH (SDH)
- MAIN DEFINITION: Originally created for the deaf and hard-of-hearing community, captions have evolved to function in various ways, including the ability to act as optional subtitles.
- Captions display dialogue, the information about who is speaking, and indicate important other sounds (example, footsteps)
- Open captions are technically understood as subtitles because they can only act as a permanent, viewable part of the media. They are used by the filmmaking community for this reason.
- Closed captions (CC) can be visually turned on/off by the viewer. Closed Captions are created and supplied as extra files (SRT's / sidecar) which are attached to the media playback, using various media systems for editing preparation and playback
- CC style is traditionally in white block text against a solid black background, overlaying the media at the lower third of the frame.
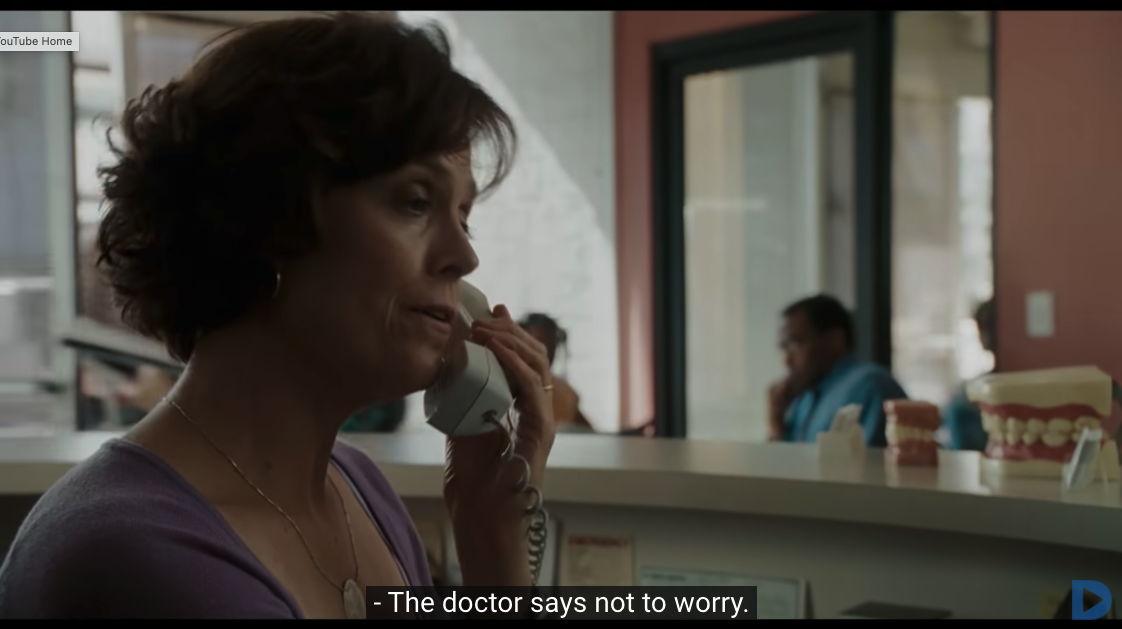
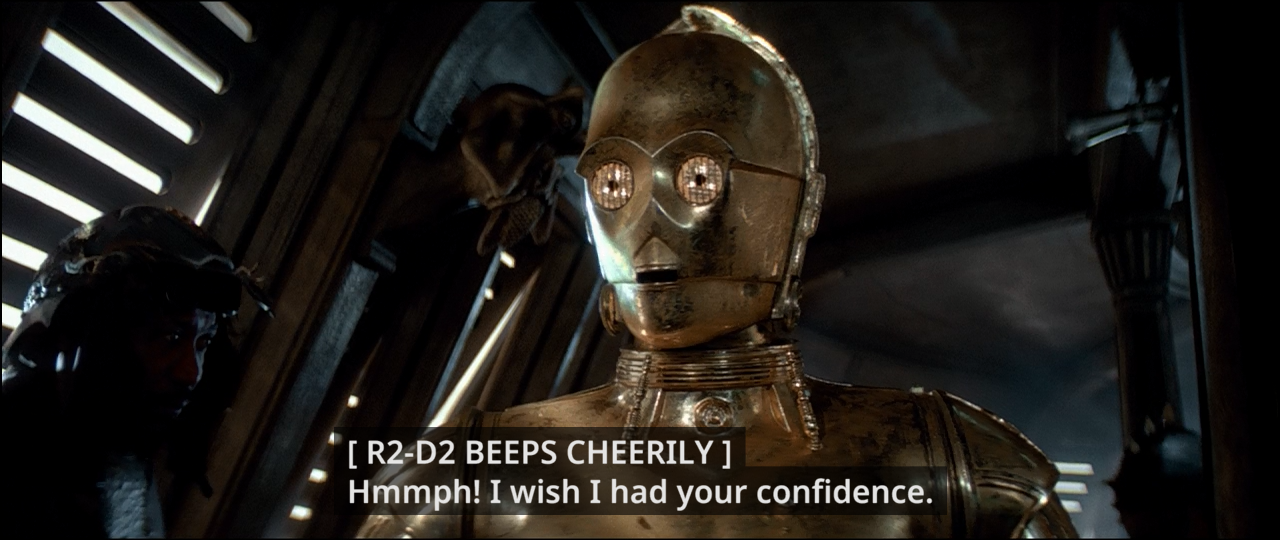
- Subtitles for the Deaf and Hard-of-Hearing [SDH] In the professional broadcast world, SDH captions are designed for viewers that cannot hear the audio (deaf community). Because of this, the SDH text includes more sound-describing information: dialogue, name of speaker, background sounds, effects, and music.
- SDH needs to describe any sound that influences the story, and how it does this influences how it is understood. The expressiveness of chosen words are important, as are words quickly understood by an average audience.
- SDH style can have variable colour and background, but usually stay within white or yellow text, a simple sans serif font, and use a black or semi-transparent black background. An example of how they look is below.
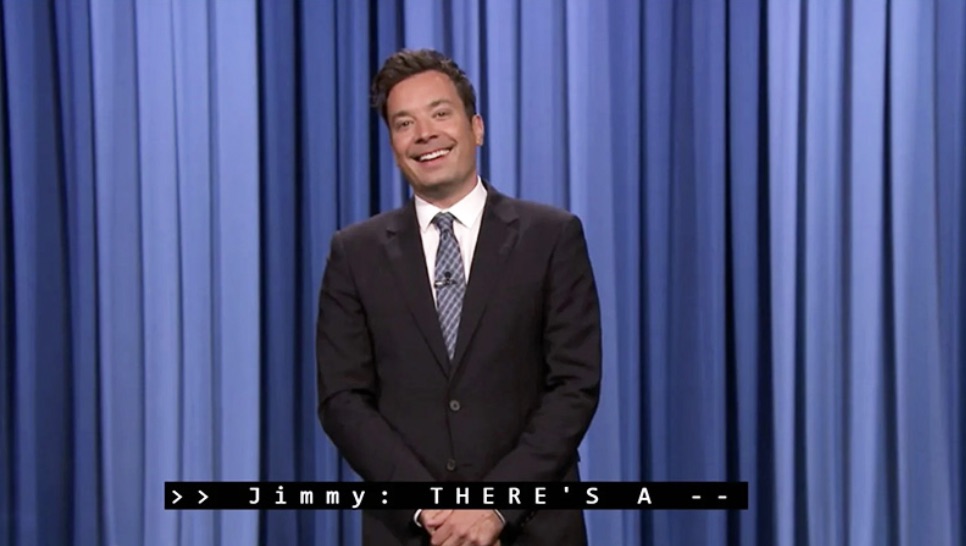
- Auto, or Live-Generated closed captions: a computer system interprets what it hears, and available only if this has been activated by the media provider and the hosting service. Sometimes funny, sometimes offensive, and rarely fully accurate. This cannot identify separate voices or effects. Text is "Monospace" font, and is white against a black background, and appears at the bottom centre of the screen. An example of how they look is below.
SRT / SIDECAR SUBTITLE FILE
- The digital SRT or "Sidecar" file is the subtitle/captioning file created by the filmmaker and delivered with their film file as a separate file. This file is imported and synchs with the film file.
- When used for film festivals it will appear as traditional burned-in subtitles (open captions).
- When used for media-on-demand in broadcast or online, visibility can be turned on/off by the viewer (a type of closed captions).
- See the SRT chapter for more information
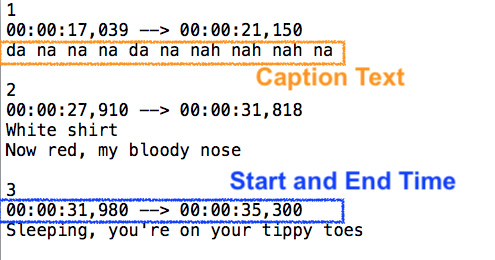
This is an example of what the information content inside of an SRT file looks like.
WebVTT
A “Web Video Text Track” file, also known as WebVTT (.vtt), is becoming a popular online distribution subtitle and caption file format. WebVTT was created in 2010 by the Web Hypertext Application Technology Working Group (WHATWG) to support text tracks in HTML5.
WebVTT was broadly based on the SRT SupRip format, another popular caption format, and was even called WebSRT with the same .srt file extension. Later, it was renamed WebVTT and introduced with the tag for HTML5.
This type of file isn't fully recognized in professional settings, so is still more of a niche approach, and will require a software other than Premiere to create.
2. Guidelines
There are rules and guidelines for subtitles and captions, and these vary depending on their intended use, and which media broadcaster is requiring them. Guidelines include the formatting and positioning of the text, and importantly, all of the ways in which sound and dialogue must be identified and notated.
Who is responsible for providing them?
The filmmaker and/or producer makes sure to have these created and provides the files.
Translated languages: English is considered to be the international language standard, so if the film's dialogue is not in English, the filmmaker must arrange to have subtitles created in the original and English languages. The festival is responsible for translating the subtitle text into their own language if it is other than English.
What is provided?
Dialogue script: a basic text document that provides all of the dialogue and names of who is speaking.
SRT subtitle file: (SubRip Subtitle is a specially prepared file) If the film's language is other than English, an SRT file is created for this, and a second SRT captioning file is provided in English.
All descriptions and interpretations are not equal!
While it seems like a creative interpretation, it is quite important to have your captions provide the needed information that lets the hard-of-hearing audience know what is going on. That said, using the best descriptive words can make a big difference in how information is understood. For example, look at all of the ways that music is described in various Netflix films.

But, There are a LOT of Rules for Professional Broadcasting.
Consider both Netflix and the BBC's guide for subtitling to learn about requirements for interpreting dialogue performance, accents in speech and dialect, incorrect grammar, pauses, interruptions timing for jokes and humour, and more. There are some significant differences between the two companies.
Netflix Caption Guidelines (English)
Capital Creations Caption Guidelines
BBC "How Do I Create Subtitles"
Basic FORMATTING Guidelines
Types of fonts
- must be simple and easy to read
- most often is a sans serif or simple serif font, medium weight
- Use a non-proportional font, also called monospace, if possible. A non-proportional font uses the same fixed width to display its characters, while a proportional font uses varying widths to display each of its letters and symbols.

Fonts often used in captions/subtitles
Monospace / non-proportional fonts: Monaco, Courier
Proportional fonts: (sans serif) Lucia Grande, Tahoma, Verdana, Arial; (serif) Times,
Size of font
- 47pt for HD resolution (1920 x 1080)
- 32pt for SD Standard Def resolution
- This frame grab shows the font size of captions/subtitles in the screen

Colour of font
- white: standard colour open captions, closed captions
- yellow: narrator voice; used less frequently than white as a general colour
- other colours: used to separate different speakers in a dialogue scene
Alignment
- horizontally, it is usually centered
- vertically, it is usually in the lower third so it doesn't obscure important information. If there IS important information down there, you can temporarily place the subtitle/caption text in the next closest spot for that shot.
- Layers or horizontal positioning on sides of screen: if there are multiple characters speaking, the dialogue can be layered one on top of the other, or they can be placed on the side the character is located. If it is a dialogue between, try to connect them so they indicate continuity. For example, in this image:

- TECH BUG NOTE: Premiere Pro "alignment" option do not work automatically. Use the "Position Caption Block" icon in the formatting toolbar to quickly set this up. You may need to make X and Y position adjustments, but this should do the trick.
Some General Guides
How much text? The number of text characters per line: limit of 42
Appearance timing: always aim to match the appearance of the subtitle to coincide with the onset of the spoken dialogue. Avoid having subtitles carry into the next shot, or from appearing before the shot begins.
Pacing: have the subtitle match the pace of the line of dialogue, and do not let it linger more than 1.5 seconds after it is completed.
Moving lips: if there are moving lips on a character, there always needs to be subtitles.
Who is speaking? Using separate colours on multiple character's lines of dialogue is preferred but not always possible. Otherwise, it's common to use name labels.
Where the speech for two or more speakers of different colours is combined in one subtitle, their speech runs on: i.e. you don't start a new line for each new speaker. Example:
Did you see Jane? I thought she went home.
But, if using white text only and two or more speakers are interacting, you have to start a new line for each new speaker, preceded by a hyphen without a space.
-Did you see Jane?
-I thought she went home.
By convention, a narrator is indicated by a yellow colour.
Interruptions: Use two hyphens to indicate abrupt interruptions.
-What are you--
-Be quiet!
She hesitated… about accepting the job.
Use an ellipsis without a space at the start of a subtitle to indicate that a subtitle is starting mid-sentence.…have signed an agreement.
Line Treatment
- Maximum two lines.
- Text should usually be kept to one line, unless it exceeds the character limitation.
- Prefer a bottom-heavy pyramid shape for subtitles when multiple line break options present themselves, but avoid having just one or two words on the top line.
- Follow these basic principles when the text has to be broken into 2 lines:
- The line should be broken:
- after punctuation marks
- before conjunctions
- before prepositions
- The line break should not separate
- a noun from an article
- a noun from an adjective
- a first name from a last name
- a verb from a subject pronoun
- a prepositional verb from its preposition
- a verb from an auxiliary, reflexive pronoun or negation
Some GUIDELINES and SAMPLES in application
| Description | Examples | |
|---|---|---|
| Speaker Identifiers | Speaker IDs are necessary when it is not clear who is speaking, a speaker is off-screen, etc, but not if the characters are on screen. Identifies the name of the speaker, usually using all capital letters followed by a colon (:) and the accompanying speech. This is the classic form, but speakers may also be identified in any other non-speech caption. The bracketed format is an alternative. | BOND: Have you got him? NARRATOR: This is the island of New Penzance. CROWD: Envy! Envy! [Pat] I don’t have an iPod. |
| Language Identifiers | Identifies the language spoken. May be accompanied by a separate, hard-coded subtitle track. In such cases, the language identifier is placed at the TOP of the screen so as not to interfere with the subtitles at the bottom. | [IN FOREIGN LANGUAGE] [SPEAKING IN ALIEN LANGUAGE] (SPEAKING FRENCH) [SPEAKS IN NYANJA] |
| Sound Effects | Includes a wide range of non-speech sounds. There is a distinction between sound effects and non-speech sounds that emanate from a speaker’s vocal chords (paralanguage). | (RAINDROPS PATTERING) [Plane Passing Overhead] [EGGS SQUEALING THEN POPPING] |
| Paralanguage | Includes sounds made by speakers that can’t or shouldn’t be transcribed as distinct speech. | [CROWD SCREAMS] (GRUNTS IN ALARM) [ANGELIQUE LAUGHS] (PANTING) [PAVEL YELLING] |
| Manner of Speaking Identifiers | Describes a speaker’s significant way of pronouncing words. For the sake of definition, manner identifiers are preceded or accompanied by the speech they qualify. | (WHISPERS) Don’t go! (sobbing deeply): She’s dead! She’s dead… (drunken slurring): It’s a little late, isn’t it? [French accent] With pleasure. |
| Music | Includes song titles, music notes, music lyrics, and descriptions of music. | (SOUS LE CIEL DE PARIS PLAYING ON GRAMOPHONE) [vivacious, sparkling melody continues] [♪♪♪] ♪ Searchin’ for light in the darkness ♪ |
| Channel Identifiers | Identifies the medium of communication such as TV, PA, radio, etc. May be combined with Speaker IDs or other NSI. | WOMAN [OVER PA]: Your attention, please. PIENAAR [OVER RADIO]: He’s not gonna talk. WOMAN [ON TV]: This is remarkable. |
Here are some examples of what these look like when applied.
Speaker Identifiers
Language Identifiers
Sound Effects
Paralanguage
Manner of Speaking Identifiers
Music
Channel Identifiers
3. SRT and Dialogue Files
The file is created initially within the editing environment as prepared captions. When working in Premiere, your captions can be directly exported as an SRT file.
Premiere SRT files have embedded information based on timecode. It includes the start and stop of the timecode placement, and the caption information for each of those segments.
The limit for Premiere is that the file doesn't retain any information about sizing, colour and placement of the captions. An alternative is to use another type of captioning software. That additional formatting information allows it to be imported into a media player with the final media file, and the embedded timecode synchs it frame-by-frame with the film's file, and matches the general visual qualities. Professional broadcasters will need to have SRT files that contain these qualities so that your captions suit their standards for captioning.
Every SRT file is made up of four components:
- The number of the caption frame in sequence
- Beginning & ending timecodes for when caption frame should appear
- The caption itself
- Blank line indicating the start of new caption sequence
EXAMPLE:
1
00:00:00,498 --> 00:00:02,827
- Here's what I love most
about food and diet.

2
00:00:02,827 --> 00:00:06,383
We all eat several times a day,
and we're totally in charge

3
00:00:06,383 --> 00:00:09,427
of what goes on our plate
and what stays off.
There are different types of captions to choose from, and they relate to the intended destination, such as posting to online media versus delivering it for professional broadcasting.
- SRT files are generated by exporting the captions you've created from inside of Premiere.
- If you don't have Premiere, but have a good editing software, you may need to export what's called a XML file, and then processing it using an SRT conversion software. Free online conversion sites can be found easily. Here is an example of one.
- SRT files use the editing timeline's timecode IN and OUT and the typed in captions to create every caption CUE, which is what governs how it plays back with your exported media. Basic font and placement choices are also included in the SRT file's information. When loaded into a basic Notepad or Text Reader app, you can review the file and edit it if needed (but not recommended unless you're familiar with the process).
4. Creating Captions and SRTs
DEMO PROJECT for DOWNLOAD
DOWNLOAD THE Captions Project Demo file and unzip, then open it in Premiere. There's a practice sequence, and multiple demo sequences. The folder also includes a Subtitle Package example.
TUTORIAL
Use Premiere to work within a familiar editing environment. This section will rely on you checking out one of the online tutorials if you want step-by-step instruction.This Adobe text-based tutorial is simple and easy to follow.
This Adobe video and webpage tutorial is easy and quick to follow too.
This video tutorial from VideoRevealed is good.
What You Need to Get Started
- Your video media
- A dialogue script
- Editing software that can create captions (like Premiere)
WHAT IS A DIALOGUE SCRIPT?
A DIALOGUE SCRIPT is exactly what you think it is! It's a document that lists the cast of characters, and contains all of the dialogue with the character names. What is doesn't contain is all of the scene descriptions.This script is used exclusively to assist a captioner that would be involved in creating translations later on (language translation or hearing accessibility purposes).
PROCESS FOR CREATING A DIALOGUE SCRIPT
Use the film's original script to guide your caption input. After creating the captions, you can then export an SRT and use it's content to generate a dialogue script.
Open the exported SRT file using a basic text reader like NotePad (PC) or TextEdit (Mac). You can then copy and paste this content into a standard word document. Save this document as your Dialogue Script. When a captioner receives this, they'll now have the exact timecode to guide the alignment of their translation captions.
Three Creation Options for Premiere
- You can create new captions in your Premiere editing file
- Or, you can import an SRT movie caption file into your editing space and continue to edit / affect them.
- Or, you can use Auto Speech-to-Text Transcription in Premiere, (some have used Facebook for this too), and then edit the results and create the new captions from this activity.
Other than Premiere
2021 Premiere has a significant limitation. It does not export the formatting information on subtitles. That includes colour, size and position of the captions. Professional broadcasters want and need this information. BUT, YouTube does not, and so the Premiere export SRT file will be fine.
This site explains how to edit your SRT document to add the formatting manually (This is really labour intensive).
Here are some suggestion for free or low-cost subtitle software that is for creating captions. You'll need to look through them to see if they retain formatting for SRT export.
Two Export Outcomes
- You can create captions and export them as separate "sidecar" files, which includes the SRT.
- The limit of Premiere is that the formatting will NOT be retained.
- You can create captions and "burn" them into your exported media.
- The formatting WILL be retained.
Which caption type should I choose?
In general, you should choose SUBTITLE. There are a few caption types to choose from, but this is the most relevant for consumer and semi-professional use.Subtitle. A "sub rip subtitle" format, generally and widely used by consumer and professional levels. Can be used for online, broadcast and theatrical uses. You can edit this file's information manually if needed, by using a simple application like TextEdit or NotePad (none of the other ones allow this).
Unfortunately, Premiere's method does NOT include position formatting in the exported file. This can be a problem for broadcaster needs, who usually require positioning fixes, to make sure text doesn't cover actor's mouths, etc.. To accomplish this level of formatting in your SRT, you'll need to use a professional level caption software.
CEA-608 (Standard Definition TV, analog broadcast, outdated), Closed Captions used for the Deaf and Hard of Hearing Community, aka SDH. White on black only, 1 font size.
CEA-708 (High Definition), also SDH. Closed Captions modern standard. Can appear as static or scrolling. Used in TV and mobile platforms. White on black only, 3 font size options.
EBU Subtitle. A European modern standard, professional format for TV broadcast, available in 25 and 30fps. This is usually distributed as an STL file. You can't manually edit the file's "text" information without specialty software.
Teletext: a UK / Euro standard, using 25fps. This is for live captioning. You can't manually edit the file's "text" information without specialty software.
Speech-To-Text Auto Transcription
Review the video / website tutorial to learn this. Premiere is able to analyze the audio in your Timeline and come up with captions automatically. It can pick up voices within a background and music soundtrack. It creates a singular line of text, and you'll need to separate it out.
Click the Transcribe sequence button in the Text panel.
Modify a few settings before the process begins. Oddly, it can also identify different types of voices to generate Speaker 1, 2, etc.. This is considered a potential issue (privacy, data mining?), and a warning window pops up to ask if it's okay.
The render can take a while, even for a really short clip.
Once done, you'll see text appear in the Text panel's captions.
To edit this, EXPORT this as an SRT file
Open the SRT file using NotePad (PC) or TextEdit (Mac). Separate out the lines of dialogue and properly identify the character names. You've now created the basis for a Dialogue Script. Use this file to
TIPS & TRICKS
- Increase the height of the audio waveform so you can also see the dialogue start and stop points
- Use Markers to place timeline indicators. Select the video clip and type the letter M. A small tag appears on the video.
- Apply colour coding to the dialogue to help visually track character's dialogue captions (select caption clip, Edit Label)
- If you remove a Captions item during an edit, it is deleted from the Captions track. You will need to recreate it manually if you restore that clip or clip section.
- Use the "Essential Graphics" panel to customize text format. But be aware that subtitles/captions have guidelines! Choose the "Edit" tab and select your clip to bring up the options. Create a Track Style to retain your formatting, which will apply consistent formatting as you go.
Export Options
Option 1: Export Captions immediately as an SRT file. The purpose is to use them in other editing situations, or to just test them.
- DO this after creating the captions, and while in the Captions Workspace
- In the Captions Panel, use the " ... " menu (upper right) to select > Export to SRT file
Option 2: Export using Encoder's environment for media and SRT file, or media with burned in subtitles.
- With the timeline selected, export your media and captions
- File > Export Media
- Encoder opens > Export Settings > Captions tab, select one of the following:
- Create Sidecar File
- Burn Captions Into Video
- Embed in Output File (just above, refer to the requirements for caption file format choices)
- When choosing SRT, add the "include SRT styling" checkbox option
Use an existing SRT to Edit Cations
You are importing an external SRT file into your editing project, and dragging it to the captions track. You may need to reposition it so it aligns properly.
By applying MARKERS on your video / audio to indicate your first (or all) dialogue IN point, you can quickly align an imported SRT caption file.
- File > Import > select your SRT file
- It appears in your Project Manager panel
- Drag it to your pre-made subtitle track.
- WARNING: Notice that while the individual captions retain their placement in relation to each other, the entire collection likely does not know where to start. It goes wherever you place it.
- Have all captions selected, and slide to re-position these to align correctly.
- By applying MARKERS on your video / audio to indicate your first (or all) dialogue IN point, you can quickly align an imported SRT caption file.
Embedded Files
This is limited to professional broadcast services.
You can IMPORT and EDIT pre-made captions that are "embedded" within your imported media file. These are caption files that travel within the media itself, and are not visible in any other way except to appear as editable files when imported correctly into Premiere.
You can import files that already have closed captions embedded in them, or closed caption "sidecar" files. You can import the files into your project by doing one of the following:
- Select File > Import to import embedded caption files or caption "sidecar" files.
- Import through the Media Browser using the file's context menu.
For example, when you import a QuickTime clip that contains embedded captions, the captions are automatically imported. If a QuickTime clip has an accompanying "sidecar" caption file, then import the "sidecar" file just like you import any other file.
To detect and automatically import embedded caption data in a media file, select the Include Captions On Import check box under the Media section in the Preferences dialog box.
The option to "Export as Embedded" is available only for pro codecs like MXF OP1a, DNX, and ProRes and requires that the caption track format be set to one of the broadcast standards like CEA-608. QuickTime embedded export currently only supports embedding CEA-608. For example, if you have an SRT in sequence, that cannot be embedded.